We are proud to present a sampling of of ILM’s visual effects work for Marvel's blockbuster hit, 'Captain America: The Winter Soldier' directed by brothers Anthony and Joe Russo.
This reel represents a small sampling of the nearly 900 visual effects shots ILM contributed to the film created by an international crew of 300+.
The bulk of ILM's work appears in the film's third act and consists of the helicarrier's massive underwater hanger, their ensuing battle, and the helicarriers themselves inside and out, sprawling digital Washington D.C. and Rosslyn environments including the Triskelion building complex on Roosevelt Island, highly detailed digital doubles for Black Widow (Scarlett Johansson) and Falcon (Anthony Mackie).
This product DOSCH 3D: Car Details 2015 contains a 3D-model with all critical parts and systems found in a non-branded sedan car. It is ideal for depictions of driving-related processes, interior and safety functions, as well as a multitude of technical details.
Use the 3D-model for technical visualizations, animations or illustrations.
The completely textured 3D-models are provided in multiple file formats: 3DS, 3dsmax (version 9 and above), 3dsmax V9 & VRay, 3dsmax V9 & Mental Ray, Lightwave (version 6 and above), FBX, Universal 3D, OBJ, Artlantis, Modo, VRML, Collada, SoftimageXSI, Cinema 4D version 13 and above, DWG, Maya and KeyShot.
ELYSIUM 3d Breakdown by Whiskytree about their work on ELYSIUM Movie. The environment of Elysium is comprised of trillions of surfaces, and our VFX breakdown helps to highlight why…
Take a Sneak Peek at What’s New in RealFlow 2015. Next Limit has begun to release RealFlow 2015 Preview of its upcoming version of RealFlow, see the new features in action.
RealFlow 2015 Sneak Peek: New Robust Method
Awesome New feature in RealFlow 2015 providing a robust method to calculate the geometry distance field in Realflow. This is invaluable for geometries which are not well-defined, watertight or manifold.
RealFlow 2015 Sneak Peek: Crown Daemon
Showcasing the new Crown Daemon in RealFlow 2015.
RealFlow 2015 Sneak Peek: Spline Curves
RealFlow 2015 Sneak Peek video demonstrates the new feature for Splines Curves: Spline tools, import your curves, enhanced dSpline daemon and emitters.
RealFlow 2015 Sneak Peek: Spreadsheets operations over 84 Million Hybrido particles
RealFlow 2015 Sneak Peek video showcases the new Spreadsheets feature, available for most of the RF Nodes. You will be able to select, filter, modify and visualize your operations.
RealFlow 2015 Sneak Peek: Spreadsheets operations over SPH particles
RealFlow 2015 Sneak Peek video showcases the new Spreadsheets feature, available for most of the RF Nodes. You will be able to select, filter, modify and visualize your operations.
Breaking a Stone Golem using new features in Pulldownit, You can read the Case Study below how Andres de Mingo broke the animated Golem in dynamics and other technical details about this funny shot.
Modeling the environment
The environment of the scene was modeled in 3d Max using polygonals modifiers and adding roughness to the mountains in ZBrush, for not increasing too much the poly count, I applied the changes as a normal map when coming back to 3D Max.
Shading was applied using the Polypaint tool of ZBrush using several HD pictures of stones as a basis. For the little stones here and there I used a particle system in 3d Max to spread them over the ground and instancing them as geometry. The sky is a simple plane with an animated FFD modifier to get the feeling of clouds are moving on the background.
Modeling the Golem
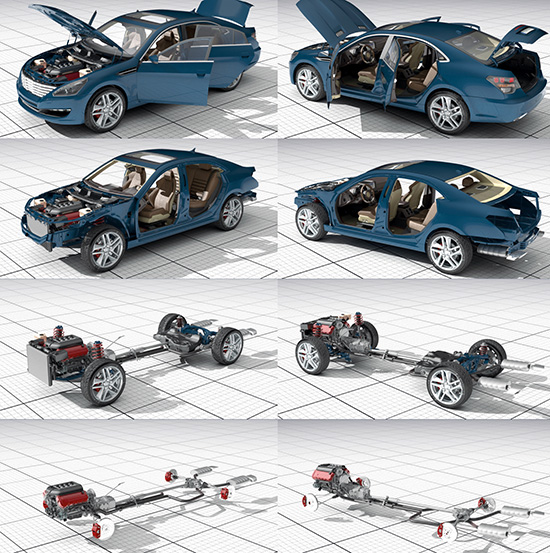
I started modeling the Golem in Max creating a low poly version of the overall shape. I had to convert this solid shape in another one made of different size stones, my first idea was using shatter it tool for doing it, uniform shatter style of PDI worked well however I wanted the fragments on the hands and feet of the golem to look like fingers and this wasn’t possible using Shatter it, besides I liked the Golem to be hollow inside to enhance the feeling of weakness when it breaks, so I figured out a different way. I took the bigger fragments generated by Shatter it on the surface for only one side of the character, making them thinner and flat, modifying its shape when necessary. That was a patience job but I got a good cover of large flat stones.
Mirroring this side of the character I got the whole model covered by stones nicely, I had just to fix a few stones on the middle for not interpenetrating each other. There were still a few little holes over the surface, to fix it I generated some particles over the holes and instanced them as geometry to cover these little areas.
After unwrapping the model I exported it to Zbrush for adding surface detail and texturing it, I used the great Polypaint tool of Zbrush for texturing it.Once again in Max, I built the rigging to can animate the Golem, I did a simple system of bones with IK Handlers, grouping the stones and linking the groups to the nearest bones.
Breaking the Golem in Dynamics
At this point I had a character made of 400 pieces, rigged and animated and I wanted the arms to break when hitting the rock in the middle. First thing I did was reshattering the pieces on the arms in about 5 shards each one to get more fragments when breaking it. I set the rock as a static convex PDi rigid body, the ground as PDi static mesh and selecting all fragments of the character I created a fracture body for it.
When simulating the scene, computation was very slow, checking the scene I discovered my ground was a high tessellate plane made of about 500000 faces! I applied a multires modifier to it cutting down the faces count to just 5000 while topology was preserved pretty well. After Updating the new ground object in PDi the simulation was much faster, however the arm of the character did strange motions when breaking and the whole character started to collapse too soon.
I decided to set up the simulation again with only the right arm of the golem in dynamics and of course the rock, after some testing I discovered that the problem was the arm motion was too fast for computing dynamics correctly, so I simply rescaled the time for making the animation 10 times slower, and this time it worked perfectly so adding the ground to Pdi and computing again I got the right arm breaking nicely.
I followed the same strategy for breaking the other arm and the chest, that is, I deleted all current Pdi bodies, setting the left arm in dynamics and simulating it along with the rock and the ground, doing in the same way for the chest of the golem after that. To take in account the flying fragments could eventually collide with those already on the ground, I set those fragments as kinematic Pdi bodies aswell.
When all the destruction job was done, I simply rescaled the time again to be 10 times faster for coming back to my original timing. But after doing it some fragments were trembling strangely over the ground so I had to cut off its motion by hand deleting its keys after the frame I wanted them to keep still. Finally I wanted the head of the Golem to bounce and roll towards the camera after breaking, for this I removed the parenting of the head and set it as a pdi body of type capsule, it was easy to make it rolling by assigning it a suited initial velocity.
Conclusions
I know breaking an animated character in dynamics is a difficult task with any tool. Pdi behaved well for shattering and dynamics, Im happy with the final result , however the setup of the scene was plenty of issues, like having to perform the simulation in 3 diferent steps. Pulldownit is an excellent plugin I wish it improves in the future to break animated characters more easily.
Author: Andres de Mingo
Guardians of the Galaxy Vfx Breakdown by Framestore
Framestore Studio created most complicated environment for Marvel’s Guardians of the Galaxy and then staged a dog-fight that explored every inch of it. Here Framestore linked up all our shots in the 4-mile wide and 1.2 billion polygon world.
The chase takes place at hundreds of miles an hour and so from shot to shot the action might travel a quarter of the way around the environment, meaning you soon see every part of it. The camera takes in all the geometry, from large-scale things such as the towers right down to individual railings, light fittings and doors.
It was built modularly, from 250 separate models based on art department designs such as towers, pillars, turbines, little huts and railings. The complete VFX Lego kit if you will. Each large element like a tower could be dressed with smaller ones like pipes to create the favela-like slums of each unique Knowhere district. Those 250 distinct models were used 85,000 times to build a city that numbered 1.2 billion polygons at render time. That’s a lot of Lego bricks. Then there’s the lighting. First the individual window lights, then the 10,000+ street lights placed by hand.
Animating the vehicles brought its own challenge. As it is essentially fighter planes flown by experienced pilots against our heroes in unfamiliar mining craft you had to feel that contrast. “Imagine the mining pods as super-charged forklift trucks, being driven by a formula one racer having to make it around some really tight corners” suggests pod chase Animation Supervisor, Dale Newton.
The Necrocraft are a different matter entirely. “Believe it or not James Gunn gave us the reference of flies on shit, shot in slow motion,” says Dale. “It was an incredibly astute reference because if you watch flies they turn their heads in the direction they are going to fly to and then adjust their body and there’s this period of overshoot as they’re quite heavy compared to their thrust, it was perfect for the vehicles. Unfortunately we did have to look at a pile of shit for a long time to get the logic right.”
“We really tried to draw you into it,” he continues, “we played the camera in most of the shots as if it was on another vehicle to really give a sense of being in there. We added camera shakes too, so there’s a bit of ambient movement as if you were on another ship but you got rocked by other vehicles coming by to you get this immersive feeling.”
A fun little problem to solve was how Rocket was going to fly the pod as they, understandably, weren’t designed with space raccoons in mind. In the end we got him to clamber right up on the control panel, which put him in an awesome pose, “almost like he’s riding a super bike” as Dale puts it.
The balance of the fight tips as our heroes realise they are essentially piloting wrecking balls – robust enough to smash through another vehicle unharmed. Smart thinking, but also the source of another big FX challenge for us: super detailed slow motion explosions.
We enhanced fLush again to handle this, with our R&D and FX teams working together to make sure as much detail could be retained throughout the explosion. “The other difficulty is that no-one knows what a slow-motion explosion really looks like” explains FX Supervisor Erwann. “There have been lots of tests done at 1000 frames a second, but you can never see the level of detail we needed here. And of course no-one has ever filmed a spaceship crashing through another in slow-motion because it has never happened! It took us months to get it perfect and we needed a lot detail, smoke and fire, dust and debris, but it has turned out to be a very cool shot.”
Mery Project is a Free Rig project by José Manuel García Alvarez and Antonio Méndez Lora. A free character for animators. You CAN: You can use the character for practise and educational purposes. You can use the character to show your work in your demo reel, portfolio, on your website, etc. You CAN’T: You can’t use the character rig or any part of it for commercial purpose, like short films, movies or any content with financial gain. You can’t use the character rig without giving the appropriate credits for “meryproject.com” in your works. You must put the credits into the video or the description. You can’t use the character rig to create any pornographic, sexually explicit, violent, racist or otherwise immoral content. Meryproject.com won’t be responsible for the content made with the character. You can’t assign licenses or sublicenses for this character rig or any part of it.
A compilation of crowd simulation feature film shots done using Golaem Crowd, the crowd simulation plugin for Maya.
Feature Tools in Golaem Crowd : Placement Tool – Easy place & Re-place your Characters Behaviors – use Maya Objects as trigges Previz – Dirrectly in Maya Viewport Character Pack – Ready to use Assets with Procedural Diversity Population Tool – Customize Character Types Navigation and Locomotion – Populate Scenes in a few Clicks Character Maker – Procedural Animation on Custom Skeletons
Used in Projects by Studios: Dracula Untold – Feature Film by Framestore NIke – Commercial by Framestore Warm Bodies – Feature Film by Look Effects The Walking Dead – Tv Show by Stargate Studio Brahma – Commercial by Fullframe Films Asterix & Obelix: God Save Britannia – Feature Film by Mikros Image Game of Thrones – TV Show by Pixomondo Hercules – Feature Film by Cinesite Juhayna Al Ahly – Commercial by GHost Vfx T-Mobile – Commercial by Eight Vfx Army Base – crowd Project by Tiago Barbosa Da Vinci’s Demons – Tv Show by Union Vfx Fortress – Game Cinematics Demo by Golaem Elephant Herd – Crowd Project by Romain le Guillerm Viva – Commercial by One More The Physician – feature Film by Pixomondo
Golaem develops artist-friendly tools to animate digital characters. Integrated in Autodesk Maya, Golaem Crowd makes it easy and affordable to populate worlds with directable digital characters, from a few to thousands. Artists from all over the globe use Golaem Crowd to bring life to commercials, episodic productions, feature films and games.