
Sunday, July 27, 2014
How to create a virtual photo studio
Creative director James Cutler shows how to use 3ds Max and V-Ray elements to create a digital version of a photographic studio.

In this tutorial you will learn how to set up a studio environment for rendering a detailed and reflective watch using 3ds Max and V-Ray.
01. Making the stage
Open t_171_Max-Vray_Start.max from the files accompanying this tutorial. In the top viewport, create a box and adjust the size to 400mm x 400mm x 400mm. Name the box Stage.
Right-click the Move tool and set it to 0 for all axes in Absolute World. Convert the Stage box to an editable poly and select the lower back edge. Chamfer the edge by 100mm and set the segments to 50. Select the top, front and side faces and delete them so you are left with a curved backdrop.
Right-click the Stage then go to Object Properties and under General un-tick Visible To Camera. This will mean that the Stage does not appear in the final render but will still contribute to the scene so that the lighting you set up can bounce off it. Open the Material Editor, create a new V-Ray material and assign it to the Stage. Set the diffuse colour to R1 G1 B1.
Select the Stage and make sure that the object’s colour is different to any colour used on the watch, so that it can be easily selected in Photoshop.
02. Positioning the lights
Under Lights in the Create panel, go to the VRayLight. Turn on Targeted and set Half-Length and Half-Width to 150mm. Drag a plane light out in the viewport; with the light selected, right-click the Move tool and set X to -5.8mm, Y to 13.345mm and Z to 407.078mm.
Select the light target and set X to -5.853mm, Y to 13.345mm and Z to 186.568mm. Name the light Top Light. Turn on Invisible so the light is not seen in the render and increase Shadow Subdivisions to 32.
Create a copy of the light and name it Key Light. Position the light in Absolute World: X -5.853mm, Y -193.52mm, Z 304.437mm. Increase the Multiplier of this light to 100. Create a third copy of the light and name it Low Light. Set up the light in Absolute World: X -39.759mm, Y -38.818mm, Z 58.616mm.
Select the light target and position it in Absolute World: X -3.063mm, Y 24.74mm, Z 186.568mm. Set the multiplier to 50, and change Half-Length to 350mm and Half-Width to 100mm.
03. Use the VRaySoftbox material to simulate real soft boxes
Open the Slate Material Editor. Drag a new VRaySoftBox texture onto the slate and name it Softbox. Set the base colour to R 150, G 150, B 150. Under Hot Spot/Dark Spot tick On and set Outer Radius to 0.6.
Go to Frame and turn it on. Right-click the gradient and choose Load, then locate Frame.grd from the Assets folder.
The grid file tells V-Ray where to put a marker on the gradient ramp and what colour that marker should be; this particular grid file creates a thin black frame around the soft box. Alternatively, you can create your own by manually clicking inside the gradient box. These can also be loaded into other gradients and softbox materials.
Drag and drop the softbox texture into the texture slot of all the lights, and select Instance. Set the resolution to the maximum of 2048. C The higher the resolution, the more samples are generated for brighter areas of the texture, which improves the lighting and reflection.
04. Add aditional direct lighting
Currently the light is just coming from three main sources, which means some parts of the watch will not receive any light or reflection. To fix this, a V-Ray Dome Light can be used together with an HDR image to fill in those gaps, using a technique called Image-Based Lighting (IBL).
The dome light is a direct light that uses importance sampling to trace where the bright areas of the HDR image are, so that it knows where it should apply more samples. Compared with just adding an HDR image in the environment slot, this is a much better solution that gives fast and clean results.
Add a VRayLight into the scene, set the type to Dome and turn off Targeted. It doesn’t matter where the light is placed as long as it is perpendicular to the ground plane, and rotating the light does not affect the texture position – this is controlled via the parameters of the HDRI map. Set the Multiplier to 30 and make sure Invisible is ticked (otherwise you will see the HDR image in the background).
Under Texture, assign a VRayHDRI map and set Resolution to 2048. Drag the VRayHDRI over to the Slate Material Editor, choose Instance and name it Dome HDRI. Load your HDR image: I used 07.hdr from the zbyg HDRI Pack 1. Set the Mapping Type to Spherical so the HDRI texture is mapped correctly to the dome shape. B Then tick Flip Horizontally so that it is facing the right way inside the dome.
05. Positioning the camera and setting up exposure
Under the Create panel in Cameras, select VRay from the drop-down list and add a VRayPhysicalCamera to the scene. Position the camera in Absolute World: X -3.917mm, Y -230.287mm, Z 45.287mm. Then position the Camera Target: X -3.344mm, Y 21.12mm, Z 177.367mm. Set the Film Gate to 20.5mm and the Focal Length to 40mm, and lower the f-number to 5 and Film Speed (ISO) to 60.
Turn Vignetting off to remove the darkened edges effect and set the White Balance to Neutral. Any colour adjustments will be done in post-production, so it is best to start with an image that has a neutral white balance.
06. Adjusting the V-Ray render settings
Go to the Render Setup. In the V-Ray tab under Image Sampler (Antialiasing), set the Antialiasing Filter to Quadratic. This is a blurring filter that helps reduce unwanted harsh edges between objects. These harsh edges usually occur when a pixel is brighter than its neighbours, and can be fixed by either using a blurring filter or clamping the colour to reduce the brightness.
In the adaptive DMC Image Sampler, increase Min Subdivisions to 2 and Max Subdivisions to 6. This will improve the antialiasing and reduce noise. Under Colour Mapping, turn on both Sub-Pixel Mapping and Clamp Output. Set Clamp Level to 3 and turn off Affect Background.
Set Gamma to 2.2 and turn on Don’t Affect Colours (Adaptation Only). This tells V-Ray to do all the calculations using Gamma 2.2, but it will not burn this into the final image. This allows the final render elements to be linear, so that when compositing, they blend together correctly.
Turn on Indirect Illumination and set the secondary GI engine to Light Cache. Under Irradiance Map, set the preset to Medium, and both the HSph Subdivisions and the Interp. Samples to 150. This will improve the quality of the global illumination and reduce splotches. Turn on Show Calculation Phase to see the results during rendering.
Under Light Cache, increase the Subdivisions setting to 1500 and set the number of passes to match the number of processing cores you have available. Turn on Show Calculation Phase. In the Reconstruction parameters, tick Use Light Cache For Glossy Rays. With this option on, the light cache will be used to calculate glossy rays as well as normal GI rays, which can greatly improve render time. Go to the Render Elements tab and add the following render elements: VRayWireColor, VRayGlobalIllumination, VRayLighting, VRaySpecular, VRayReflection, VRayExtraTex, and VRayBackground.
There is no need to add a refraction element: transparency will be included in all the other elements with the glass material being set to All Channels in Refraction. The wire colour element is useful for completing post-production work. It takes the wire colour of the object in 3ds Max and renders out a flat diffuse colour that can be easily selected in Photoshop. This element also has antialiasing so you get the blurred edges from the AA filter.
In the VRayBackground parameters, untick Colour Mapping so that the background image is not affected and remains the same brightness and colour. One of the render passes to include is Ambient Occlusion: by incorporating it into a render element, it is much more efficient. Also, there is no need to turn lights off or hide transparent objects, which is a requirement in some other methods.
Select the VRayExtraTex element and add a VRayDirt map to the texture slot. Drag the VRayDirt map to the Material Editor and choose Instance. Set the Radius to 50mm, the Subdivs to 18 and turn on Work With Transparency. The radius size depends on the scene – the larger the radius, the larger the dirt will spread. So if the radius is too large for a small object, then the size of the ambient occlusion will become too much. The mode is set to Ambient Occlusion by default. Click Exclude and, from the list, select Watch Glass and move it over to the Exclude box on the right.
Go to the V-Ray tab. Under V-Ray, enable the built-in Frame Buffer and untick Get Resolution From Max. Set the Width to 5000 and Height to 3750. Tick Save Separate Render Channels and untick Save Alpha, then locate a folder to store all the render elements in. Select OpenEXR from the Save As Type drop-down; in the EXR, make sure it is set to Half Float (16 bits/channel).
Half Float has enough colour range for compositing, so there’s no need to render in Full Float unless it is required for passes such as Z-Depth. In Environment And Effects, add Chrome_ Background.tif as a background environment map. Now click Render and, in the VRay Frame Buffer, turn on Show sRGB to view the render at the correct gamma. This gamma correction will automatically be applied when opening the EXR files.
07. Compositing the render elements in Photoshop
Close the image and go to File > Scripts, and load all the files into stack. Browse to the Renders folder and select all the render elements. When prompted, choose As Alpha Channel and click OK. If you are not prompted and the layers open with transparency, you need to first open an individual layer and choose As Alpha Channel to set it as the default.
Once the render elements have loaded into the layers stack, move VRayBackground to the bottom of the stack. Then move VRayWireColor, RGB Color and VRayExtraTex to the top and turn themoff.
Select the VRayReflection, VRaySpecular, VRayLighting and VRayGlobalIllumination layers and set the blend mode to Linear Dodge (Add). Check the final composite is correct by turning on the RGB layers to make sure they match.
08. Converting 32-bit to 16-bit in Photoshop
Photoshop opens 16-bit Half Float as 32 bits per channel, and the editing tools do not work at this level. The file needs to be down-converted to 16 bits per channel – but doing so causes all the blending modes to be incorrect, resulting in a blown-out image. To fix this, assign a linear colour profile before converting. VFXForge offers a suitable profile.
In the assets folder, copy the Linear RGB ICC profile to C:\Windows\System32\spool\drivers\color. Then go to Colour Settings under Edit. By default the working space is set to Monitor RGB sRGB IEC61966-2.1: because you composited in Linear, you need to change that to match. In the RGB drop-down, choose Load RGB and browse to the Linear RGB ICC profile.
Click OK and go to Image > Mode > 16 bits/ channel, and select Don’t Merge when prompted. You may notice some colour banding:this is Photoshop not being able to display the image properly when zoomed out. If you zoom in (100%), you will see the correct image.
09. Post-production techniques
Before you do any adjustments such as levels or colour correcting you need to revert back to Monitor RGB sRGB IEC61966-2.1, otherwise any adjustments you make will be using the wrong colour setting. Go to Edit > Colour Settings to change it back to sRGB IEC61966-2.1.
Turn on and select the VRayExtraTex layer, which is the ambient occlusion data. Marquee-select the outer black area and remove it, otherwise it will affect the background layer. Set the blend mode to Multiply – you will notice shadow details will appear that were lost during rendering.
Set the Opacity to around 50%: sometimes too much ambient occlusion can make the render look unrealistic. Select all the layers in the stack apart from the background layer and convert them to a Smart Object. (This allows you to still edit the stack later on if you need to, by double-clicking on the Smart Object to open it.)
Set the Smart Object blend mode to Linear Dodge (Add). Add a Colour Balance adjustment on top and make it only affect the smart object. Set the cyan-red to -5 and the magenta–green to 2.
10. Converting the layered PSD file into an 8-bit image format
If you down-convert to 8-bit from 16-bit, you will notice some colour banding appears in the image. In order to successfully save out an 8-bit image that can be used for the web, first up-convert to 32-bit and choose Rasterize, and then Merge. There is no need to switch colour profiles to do this, so make sure you are still using sRGB IEC61966-2.1.
Now go to Image > Mode and choose 8-bit. Next choose Merge and an HDR toning window will appear. In the Method drop-down list, choose Exposure and Gamma and then click OK without adjusting any of the settings. You can now save out the final render in an 8-bit format, and it’s ready to use for the web.
James Cutler runs MintViz Workshop, the definitive resource for
CG artists, designers and generalists who are looking to develop their technical skills.
CG artists, designers and generalists who are looking to develop their technical skills.
This article originally appeared in 3D World issue 170
Friday, July 25, 2014
Friday, July 18, 2014

Thursday, July 17, 2014
Bell Boeing V22 Osprey

General characteristics
- Crew: Four (pilot, copilot and two flight engineers/crew chiefs)
- Capacity:
- 24 troops (seated), 32 troops (floor loaded), or
- 20,000 lb (9,070 kg) of internal cargo, or up to 15,000 lb (6,800 kg) of external cargo (dual hook)
- Length: 57 ft 4 in (17.5 m)
- Rotor diameter: 38 ft 0 in (11.6 m)
- Wingspan: 45 ft 10 in (14 m)
- Width with rotors: 84 ft 7 in (25.8 m)
- Height: 22 ft 1 in/6.73 m; overall with nacelles vertical (17 ft 11 in/5.5 m; at top of tailfins)
- Disc area: 2,268 ft² (212 m²)
- Wing area: 301.4 ft² (28 m²)
- Empty weight: 33,140 lb (15,032 kg)
- Loaded weight: 47,500 lb (21,500 kg)
- Max. takeoff weight: 60,500 lb (27,400 kg)

Performance
- Maximum speed: 275 knots (509 km/h, 316 mph[229]) at sea level / 305 kn (565 km/h; 351 mph) at 15,000 ft (4,600 m)[230]
- Cruise speed: 241 kn (277 mph, 446 km/h) at sea level
- Stall speed: 110 kn[52] (126 mph, 204 km/h) in airplane mode
- Range: 879 nmi (1,011 mi, 1,627 km)
- Combat radius: 390 nmi (426 mi, 722 km)
- Ferry range: 1,940 nmi (2,230 mi, 3,590 km) with auxiliary internal fuel tanks
- Service ceiling: 25,000 ft (7,620 m)
- Rate of climb: 2,320 – 4,000[52] ft/min (11.8 m/s)
- Glide ratio: 4.5:1[52]
- Disc loading: 20.9 lb/ft² at 47,500 lb GW (102.23 kg/m²)
- Power/mass: 0.259 hp/lb (427 W/kg)
Armament
- 1× 7.62 mm (0.308 in) M240 machine gun or 0.50 in (12.7 mm) M2 Browning machine gun on ramp, removable
- 1× 7.62Performance
- Maximum speed: 275 knots (509 km/h, 316 mph[229]) at sea level / 305 kn (565 km/h; 351 mph) at 15,000 ft (4,600 m)[230]
- Cruise speed: 241 kn (277 mph, 446 km/h) at sea level
- Stall speed: 110 kn[52] (126 mph, 204 km/h) in airplane mode
- Range: 879 nmi (1,011 mi, 1,627 km)
- Combat radius: 390 nmi (426 mi, 722 km)
- Ferry range: 1,940 nmi (2,230 mi, 3,590 km) with auxiliary internal fuel tanks
- Service ceiling: 25,000 ft (7,620 m)
- Rate of climb: 2,320 – 4,000[52] ft/min (11.8 m/s)
- Glide ratio: 4.5:1[52]
- Disc loading: 20.9 lb/ft² at 47,500 lb GW (102.23 kg/m²)
- Power/mass: 0.259 hp/lb (427 W/kg)
Armament- 1× 7.62 mm (0.308 in) M240 machine gun or 0.50 in (12.7 mm) M2 Browning machine gun on mm (.308 in) GAU-17 minigun, belly-mounted, retractable, video remote control in the Remote Guardian System [optional][
Wednesday, July 16, 2014
Tokyo-Based Artist Arrested For 3D Printing Her Vagina
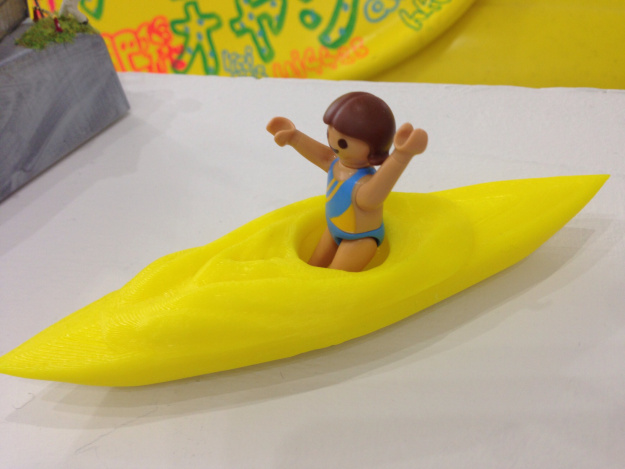
The files in question are, to be clear, fairly stylized representations of the female form, as is most of her art. Igarashi, who calls herself Rokudenashi-ko or “Good-For-Nothing Girl,” began making the prints when she decided to explore her own sexuality and the role of the female form in Japanese culture. While the male member is not as taboo in Japanese culture (NSFW example), the female genitals are all but hidden.
“As an artist, I focus on my own vagina as the motif for my art,” she wrote. “My work is against discriminative / ignorant treatment of the vagina.”
“I cannot understand why the police recognize the 3D data as obscene material,” she said.
Her fundraising goal was to raise money to build something called the Manko-boat or Manbo, essentially “pussy boat,” based on the shape of her vagina. Her charmingly innocuous pitch video appears below.
The question this arrest raises, obviously, is what can be defined as obscenity, especially in regard to self-scanning, 3D printing, and art. No rational person would mistake Igarashi’s work with pornography but, clearly, she is not dealing with rational people. In the end, control over her body and her image is solely hers and, I suspect, art will win out.
Brilliant VFX whip up a storm
A seamless combination of video and 3D animation sees a young boy encounter a sea storm in this thrilling new ad. We find out how it was made.
http://youtu.be/qXUnqQ-Er-M
Insurance company Delta Lloyd recently commissioned advertising agency TBWA\NEBOKO to create this new spot, which features the voyage of a young boy, who negotiates the elements of the ocean on a small boat.
Along his journey, he encounters seals, a storm, vortex and huge whale, all of which were created by French post production house Digital District. " 'Storm in the open sea' were the first words we heard about the film," says FX supervisor Thomas Marqué.
Naiad also provided the solution to the team's biggest challenge. "The sea surface becomes more complex in a storm, a little swash turn into a very detailed mountain full of foam and sea sprays," says FX lead Marc Thomas Cavé.

Fluid simulation software Naiad provided the Digital District team with the solution to all their sea simualtion issues
"For the surface itself, we used a NOT-ocean mesh in Naiad to create the main surface. This object is very sharp and detailed and acted as our base to work on foam, splashes, sprays and wakes. It's also the reference surface for the animator in charge of the boats. Naiad is powerful enough to make particles collide on such detailed meshes - it was a vital piece of software on this project."
http://youtu.be/qXUnqQ-Er-M
Insurance company Delta Lloyd recently commissioned advertising agency TBWA\NEBOKO to create this new spot, which features the voyage of a young boy, who negotiates the elements of the ocean on a small boat.
Along his journey, he encounters seals, a storm, vortex and huge whale, all of which were created by French post production house Digital District. " 'Storm in the open sea' were the first words we heard about the film," says FX supervisor Thomas Marqué.
The goal was simple - make it real
Naiad also provided the solution to the team's biggest challenge. "The sea surface becomes more complex in a storm, a little swash turn into a very detailed mountain full of foam and sea sprays," says FX lead Marc Thomas Cavé.
Fluid simulation software Naiad provided the Digital District team with the solution to all their sea simualtion issues
"For the surface itself, we used a NOT-ocean mesh in Naiad to create the main surface. This object is very sharp and detailed and acted as our base to work on foam, splashes, sprays and wakes. It's also the reference surface for the animator in charge of the boats. Naiad is powerful enough to make particles collide on such detailed meshes - it was a vital piece of software on this project."


Monday, July 7, 2014


Sunday, July 6, 2014


Sunday, June 29, 2014


Saturday, June 28, 2014
Thursday, June 19, 2014
ANIMATORS IN ACTION The Hobbit: The Desolation of Smaug
Hollywod production, Hobbit The Desolation of Smaug how they make
attention for mocap suite
Friday, June 13, 2014
Sunday, June 8, 2014
Thursday, May 29, 2014
Monday, May 26, 2014
Sunday, May 25, 2014
Saturday, May 24, 2014
Subscribe to:
Posts (Atom)