Strong growth in emerging economies leads to vastly increased automobile sales. Road construction and traffic management however, do not keep pace. This in turn can lead to increased car crime, making sitting in traffic a hazardous occupation. In this environment helicopters offer a very viable alternative for all types of journey, be it commuting to the office, emergency deliveries or even just getting out of the city for the weekend.
See more at technicondesign.com/france
Saturday, August 23, 2014
Friday, August 22, 2014
Technicon Design China -Imperial Concubine Concept Car
This project demonstrates the collaborative nature of Technicon's design studios around the world.
The original concept was developed in the Shanghai studio where the design of the exterior and interior were created. The interior was then modelled in the Cologne studio, the exterior was modelled in the Shanghai studio , a scale model created in the Frankfurt studio and the film concept and animation were created in the Paris studio.
The film tells the story of the concept car and illustrates how the collaboration works.The original concept was developed in the Shanghai studio where the design of the exterior and interior were created. The interior was then modelled in the Cologne studio, the exterior was modelled in the Shanghai studio , a scale model created in the Frankfurt studio and the film concept and animation were created in the Paris studio.
See more at technicondesign.com/china
Thursday, August 21, 2014
Wednesday, August 20, 2014
Tuesday, August 19, 2014
Monday, August 18, 2014
Sunday, August 17, 2014
Wednesday, August 13, 2014
Houdini Demo Reel 2014

Side Effects Software has shared its 2014 Demo Reel featuring the work of Houdini customers worldwide. From "How to Train a Dragon 2" by DreamWorks Animation to "Killzone: Shadowfall" by Guerrilla Games, the shots in this reel are a small sampling of all the amazing work created by the Houdini community of artists. A great deal of hard work and dedication has gone into every frame. Congratulations to all the artists and studios responsible for these fantastic shots
Monday, August 11, 2014
Sunday, August 10, 2014
Modern Markerless Motion Capture Technology


No Setup Time - Because no special suits, markers or equipment are required, subjects can simply step into the capture volume to begin tracking.
Benefits - This means that animators and game developers can capture more accurate motion data in less time, and for a much lower total cost. It also makes many clinical and research applications much more practical. Because there is no special setup required, it is easier to track the motion of children or people whose condition makes the application of special suits difficult. The difficulty, however, is implementing accurate tracking algorithms that perform well enough for real-time use, without the aid of markers to provide hints to the software. This capability is the core of Organic Motion’s technology.
No Markers - Markerless motion capture systems use advanced computer vision technology to identify and track subjects without the need for any special suits or markers. To accomplish this, advanced algorithms are required, especially when the expectation is to track motion in real-time.
Availability - This cutting edge technology is an active field of research at leading universities throughout the world. Organic Motion’s OpenStage 2 is the only commercially available professional markerless motion capture system on the market
today.
today.
Saturday, August 9, 2014
Review: V-Ray 2.0

Chaos Group’s plug-in renderer is already an industry standard for architectural vizualisation, and has recently made inroads into VFX. Jason Lewis puts version 2.0 of the 3ds Max edition through its paces to assess what impact new materials, stereo tools and the V-Ray RT GPU-accelerated preview renderer will have in production
Today’s CG industry is a vast landscape of ideas, processes, and procedures, and the tools used to realise artists’ visions are almost as diverse as the artists themselves. However, most projects follow a standard workflow, from asset creation through to post-production. Today, we are going to be looking at one particular tool used during the penultimate step in that process: rendering.
V-Ray has been one of the most popular third-party rendering solutions available for quite some time. It dominates the field of architectural visualization, and has recently found its way into effects for television commercials and feature films, one of the most recent examples being the environments for Tron: Legacy, where it was used alongside mental ray and RenderMan.
The Chaos Group, V-Ray’s creator, produces versions for 3ds Max, Maya, Rhino and SketchUp. A Cinema 4D edition is also available from a separate developer. However, in this review, we will focus solely on V-Ray for 3ds Max. Before we get into the new features in version 2.0, the latest release, I want to look at the software as a whole. Those of you who are familiar with version 1.5 may wish to skip ahead.
V-Ray: the fundamentals
V-Ray has been a 3ds Max plug-in since its inception, and is tightly integrated into its host software. It supports raytracing and global illumination based on the Monte Carlo sampling technique, and offers quite an extensive feature set, including displacement mapping, area lights, image-based lighting and IES photometric lights; several custom shaders, including car paint and subsurface scattering; and a physical camera that supports depth of field and 3D motion blur. You can find a full list of features on the Chaos Group website.
Speed-wise, V-Ray isn’t the fastest renderer out there, but nor is it the slowest. Instead, it falls right in the middle, with renderers based on the Reyes architecture like RenderMan on the faster side, and unbiased renderers like Maxwell Render and fryrender on the slower side.
Seamless integration
V-Ray integrates itself with 3ds Max seamlessly, with all the rendering parameters contained within Max’s Render Setup dialog. V-Ray-specific maps, materials and shaders can be accessed via the Material Editor in both classic and Slate modes, and V-Ray lights, cameras and objects are all found in their respective tabs within the Create portion of the command panel. V-Ray-specific lights and other objects have unique icons within the viewports, enabling you to distinguish them quickly from Max’s native tools, or those of other plug-ins.
This integration is one of my favorite things about V-Ray. While the alternative approach – to use a plug-in to export to a standalone application, as Maxwell Render and fryrender do – is more flexible, I personally prefer to have my entire rendering workflow remain within a single application. To some extent, this comes down to personal taste, but not having to jump back and forward forth keeps my workflow simple, clean and quick.

The Render Setup dialog is where you select V-Ray as your render engine, and where you will then find all of the main controls. The V-Ray tab holds the global switches, the controls for image sampling and color mapping, the environment lighting/reflection/refraction overrides, the camera controls, and the V-Ray frame buffer settings. The Indirect Ilumination tab holds the settings for global illumination and caustics; the Settings tab controls the under-the-hood settings (I never mess with any of these, with the exception of increasing Dynamic memory limit from the default 400MB to 10-13GB); while the Render Elements tab is self-explanatory, controlling the render passes you are generating.

Next, let’s take a quick look at V-Ray’s custom shaders. While V-Ray will render any of the Max default materials, with the exception of some of the mental ray shaders, it is recommended that you use the V-Ray-specific materials as they are extremely powerful.
The basic V-Ray material is similar to the mental ray Arch & Design material, and can be used to simulate a wide variety of surfaces, while the light material is used to make objects self-illuminated or turn them into actual light sources. There are two different subsurface scattering materials that can be used to mimic the look of skin, wax or opaque liquids; a car paint material that I will go over in more detail later since it is new in version 2.0; and VRay2SidedMtl, a two-sided material that is great for rendering translucent objects.
There is also VrayBlendMtl, which is similar to Max’s Shellac material, except that you can blend up to 10 materials (one base and nine coat materials) instead of Shellac’s one base and one coat material – you can adjust the blending for each of the nine coat materials independently of one other – and several other V-Ray shaders geared towards more technical operations.

In addition to the custom shaders, V-Ray also includes several procedural maps that can be loaded into any map slot of any material that V-Ray can render. These include VRayHDRI, V-Ray’s custom HDR image loader; VrayDirt, a procedural map that adds color to the corners and edges of an object based on its surface curvature; VrayCompTex, a map that enables you to composite two different images together to form one map; and VrayDistanceTex, a new map in version 2.0, and one I shall look at in detail later.
V-Ray also has its own custom lights and camera, and while it will render using Max’s defaults, it is highly recommended that you use the custom versions as they are tailored to work with the V-Ray render core, and offer a vast level of control. Lights can be set to rectangular area lights, spherical lights, dome lights and mesh-based lights. The V-Ray physical camera offers full angle and focal length controls, exposure control, vignetting, white balance and all the rest of the controls you would expect to find in a real-life camera.

Before we come to the new features in version 2.0, a note on hardware. For this review, all of my testing was done on an HP Z800 workstation sporting a pair of Intel Xeon X5680 six-core CPUs running at 3.33GHz. (You can read my review of the Z-series workstations here.)
However, like most modern rendering engines, V-Ray is fully multi-threaded, and therefore likes lots of CPU cores. In fact, the program scales almost linearly with the addition of every CPU core up to its limit of 32. (A few comparative speed tests on a machine equipped with a single 3.33GHz Core i7-980X processor – the desktop equivalent of the X5650 – confirmed the near-linear scaling of performance from six to twelve CPU cores.)
If you can’t afford a 12-core system, I would personally recommend at least a quad-core system. If it comes down to a higher-frequency chip with less cores or a lower-frequency chip with more cores, go with more cores: you will get a much higher bump in performance than you will with a couple of hundred extra MHz in clock speed.
New features in version 2.0
So what’s actually new in version 2.0? Although there have been some tweaks to the rendering core, most of these are subtle. The most notable are the changes to the Adaptive DMC Image sampler that allow it to properly calculate sampling points in dark areas when gamma correction is used. This effectively reduces noise in the darker areas of the rendered image.
However, most of the changes in V-Ray 2.0 are actual new features. The new car paint material takes the tedious process of creating metallic paint shaders (prior to this, usually created by combining multiple standard materials inside a VrayBlendMtl) and greatly simplifies it, giving the user easy-to-use controls that produce, in my opinion, quite good results.
Also of note here is that the standard VRayMtl now has a Dispersion checkbox in the Refraction properties that, when checked, makes the raytracer calculate proper dispersion for refractive objects. It’s a small addition, but it adds a nice level of realism to transparent objects like glass.

There are also several new procedural maps that can be used with any material that V-Ray can render. The first of these is the MultiSubTex texture. This works in much the same way as Max’s Multi/Sub-Object material, enabling you to assign multiple textures to an object’s faces according to their material ID, or different textures to different objects according to their object ID. This is useful if your scene requires a lot of variation between surfaces, but you don’t want to clutter your Material Editor with lots of different materials.
Next up is the VRayDistanceTex texture. This is a procedural texture that blends colors or individual maps based on the distance between two or more objects, the first being the object that the map is applied to, and the others being those specified in the map properties. It has many possible uses, such as creating effects on an object where other objects intersect it, as illustrated below.


In addition to the new maps listed above, the VRayHDRI map has been expanded to include support for tiled OpenEXR files as well as other HDR formats: the new img2tiledexr tool is included for batch conversion of images to tiled EXR files.
Render passes, effects and options
Version 2.0 also includes a number of new render elements. VRayLightSelect is a new render pass that allows you to save out the lighting contribution of a specific light or group of lights into a separate render pass; while VRayDRBucket shows which render node rendered which bucket when distributed rendering is used. This can be very useful for diagnosing a malfunctioning system in a large render farm.
Lastly, there is the new VRayLensEffects render effect. This is basically a highly optimized post effect for creating realistic glows and glare. The effect is highly customizable, and, in my opinion, works quite nicely. However, it probably won’t find much use in production environments as there is no option to save out the result as a separate pass in the Render Elements panel: a curious omission.
In addition to the new render features, VRayEnvironmentFog has been updated. Unlike previous versions of V-Ray, environment fog can now be assigned to multiple gizmos in a scene, instead of just one.

V-Ray 2.0 now includes native support for 3D stereoscopic rendering. This feature alone makes the upgrade worthwhile if you are planning on rendering 3D footage. It is simple to set up – you just add a VRayStereoscopic helper object to the scene – and the settings are easy to use.
There is also the VRayStereoRig controller. Unlike the VRayStereoscopic helper, which creates left and right-eye cameras from a single camera in the scene, this enables you to place two cameras in the scene manually. This can be used where the left and right-eye cameras must be defined separately: for example, when their animation is predefined by motion-capture data.
GPU acceleration: a disclaimer
The other big news is that Chaos Group’s interactive preview renderer, V-Ray RT, now ships as part of V-Ray 2.0, where previously they were marketed as separate products. At the time of writing, I haven’t been able to get V-Ray RT to work on my test system – which is curious, since V-Ray 2.0 itself is stable, and works flawlessly – so this part of the article is based on the software specifications, and demos of RT I have witnessed.
V-Ray RT offers a fast, near-production quality preview in Max’s ActiveShade window in order to provide rapid feedback when fine-tuning a scene before sending it off for final beauty rendering. It supports most of V-Ray’s render features, and will use both the host system’s CPUs and any available GPUs. This greatly enhances performance and offers near-real-time feedback similar to that provided by other GPU-accelerated renderers like iray and Arion.
However, V-Ray RT has something going for it that iray and Arion don’t: OpenCL support. While Nvidia’s CUDA architecture, used in other GPU-accelerated renderers, is a strong foundation to build on, it has the limitation of only running on Nvidia hardware. Nvidia GPUs are powerful, but users like to have choices, and since OpenCL is supported by both Nvidia and AMD, V-Ray RT can be used with GPUs from either manufacturer.

V-Ray has consistently proven itself a high-quality, feature-rich application, and one that has demonstrated that it can run with the big boys through its use in high-profile movie projects.
The new feature set with version 2.0 is extensive, and all of the new features are actually useful: by no means a given in other applications. Throw in stereo rendering and (despite my test system’s issues with it) the V-Ray RT preview renderer and you have an all-inclusive package.
While it would have been nice to see more substantial performance increases in version 2.0, V-Ray is still on a par with other renderers that use similar underlying technologies when it comes to raw speed. Overall, V-Ray 2.0 is another winning release, and one that is sure to satisfy even the most hardcore rendering enthusiast.
With thanks to
I would like to give an special thanks to the following people and organizations who contributed resources to help in the completion of this review:
Darina Georgieva and Maria Padalski of Chaos Group

A note on learning resources
V-Ray ships with an extensive web-based user manual: one of the best I have ever seen for a plug-in renderer. However, there are several third-party resources that may be useful when learning the software. The Gnomon Workshop has several tutorials that use V-Ray as the rendering package, as do both Digital-Tutors and CGtuts+. Legrenzi Studio offers a complete book entitled V-Ray: The complete guide, which can be purchased either as a traditional hardcover book (first edition only), or downloaded as a PDF, and which provides a wealth of information. I would highly recommend it for anyone who is serious about becoming a V-Ray power user.
One last resource I would like to mention is Evermotion. Its pre-built and pre-lit architectural scenes – both indoor and outdoor environments – are some of the best-looking around, and reverse-engineering them is a great way to learn about good lighting set-ups.
Friday, August 8, 2014
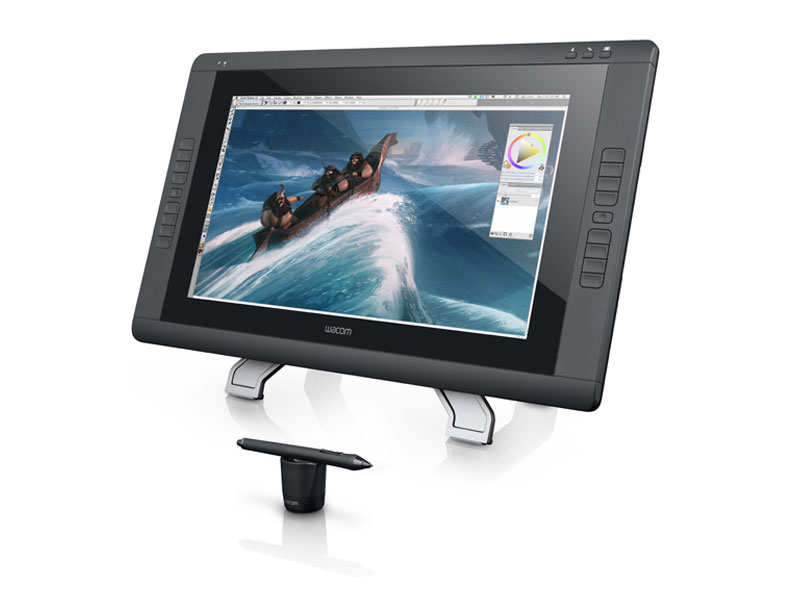
Review: Wacom Cintiq 22HD pen display
Wacom’s Cintiq 24HD set a new benchmark for input devices. But by shaving off $600 from the price – not to mention a whopping 45 pounds in weight – the new 22HD goes one better, says Fernando Caire.
When we reviewed Wacom’s Cintiq 24HD pen display earlier this year, we were easily impressed by its large high-definition display, the custom key layout and the screen’s responsiveness. What was less impressive was the weight and restrictive movement of the counterweight stand.
In that review, we made numerous comparisons between the 24HD and the 21UX: its smaller, inferior sister model. Since then, Wacom has announced its new Cintiq lineup, including a replacement for the 21UX, the 22HD. It has the same key features as the 24HD, but lacks its ridiculous weight and, like the 21UX, can be turned 180 degrees left or right. At $1,999 – $600 less than the 24HD – is this the better choice for CG artists?
Physical specifications and setup
Right out of the box, there is an immediate and noticeable difference: the 22HD weighs in at only 18.7 pounds – less than a third of the weight of the back-breaking 63.8-pound 24HD. At 55mm thick, it’s also a fraction more slimline. Whereas just getting the 24HD out of the box was a two-person job (once it was set up, I hoped I never had to move it again), the 22HD is easy to move from place to place.
Setup is easy: you only need to put up the stand, slide the screen into place, and it’s ready to go. Unlike the 24HD, the screen pivots on the stand so it can be turned 180 degrees in either direction. The screen can also be laid down flat or pulled upright using the side levers, then locked into any position you want once the levers are released. Performing any of these actions is quick and easy, and will not interrupt your workflow.
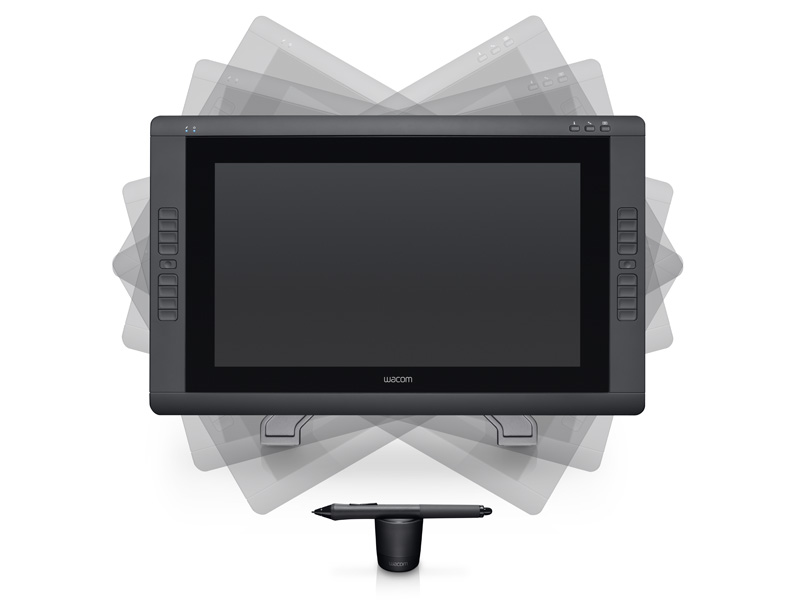

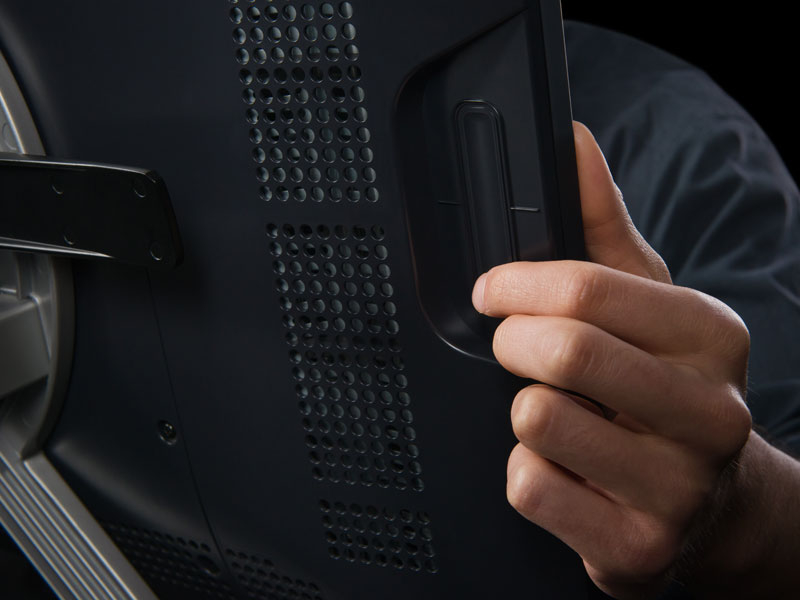
The other thing that sets the 22HD apart is the button interface. Where as the 24HD had only 10 assignable ExpressKeys, the 22HD has 16: eight on each side. This will especially be handy for those who work in 3D and require the extra hotkey options at their disposal. The one thing I wish Wacom could have upgraded is the Touch Strips. The Touch Rings on the 24HD are efficient and got the results I needed quickly, since the wheel enabled me to scroll continuously without having to lift my finger or pause. With the Touch Strips, however, it’s necessary to slide your finger up or down, lift it, bring it back, and repeat until you get the desired result.
However, this is nit-picking: in all other respects, the Touch Strips perform well, and are conveniently positioned on the back of the device, directly behind the toggle buttons that change their function (each Touch Strip can have up to four), making it easy to switch function with your thumb while scrolling with your index finger. This feels incredibly comfortable and makes performing numerous functions using the Touch Strips a breeze.
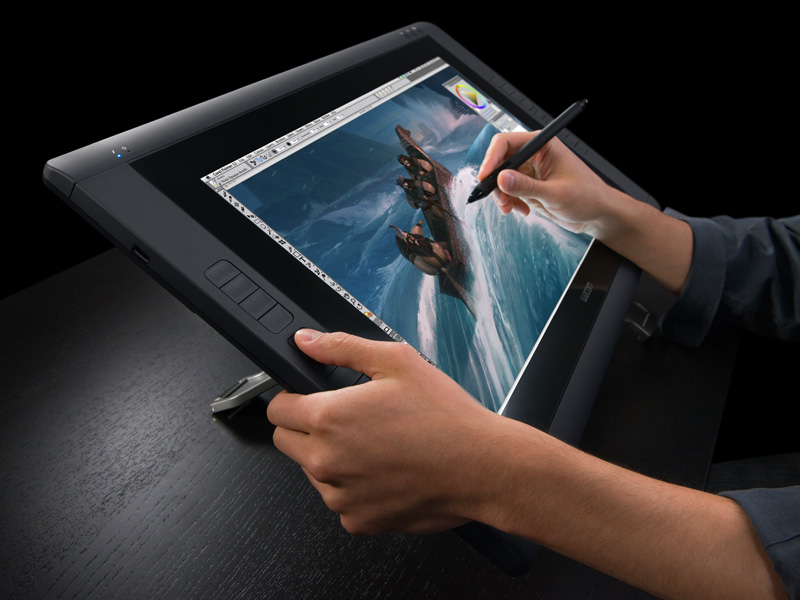
Display resolution and pen sensitivity
The brightness of the 22HD’s display (230 cd/m2) is actually much higher than that of the 24HD (190 cd/m2) and with a viewing angle of 178 degrees, it would be difficult to not see your art work in full clarity, no matter where you stand. At 1,920 x 1,080 pixels and capable of displaying over 16.7 million colors, it should ensure your art pieces appear crystal clear. The color accuracy is pretty spot on but for those who really need it to be accurate, the 24HD (92% Adobe RGB) or the 24HD Touch (97% Adobe RGB) may be better suited for your needs.
And with 2,048 pressure levels and a 60-degree tilt angle, the pen flows smoothly and feels completely natural and very responsive. (This isn’t actually a change in specification, but if it ain’t broke, don’t fix it, right?)
The only thing I don’t understand is why gestural controls weren’t included in this model, given that they are supported in the 24HD touch, announced at the same time as the 22HD. When we reviewed the Intuos5 range of tablets, one of my favorite new features was the ability to use gesture controls to activate ExpressKeys and functions – and it isn’t as if they were confined to the largest tablet in the range.
It’s possible that Wacom has left out gestural controls to keep the 22HD cost-effective – the 24HD touch sells for a whopping $3,699 ($1,100 more than the 24HD) – but it would be nice to think that one day, there will be a Cintiq with this feature that won’t put quite such a hole in your bank account.
Overall verdict
Besides a few trivial complaints, this is the best pen display I have ever used – and probably the best drawing tablet available on the market. Yes, I know I said exactly the same thing about the 24HD, but the new model goes one better. It’s comfortable to use, 45 pounds lighter, has an additional 6 ExpressKeys, and the rotatable screen looks amazing. Given that it also shaves off $600 in price, and stops me putting out my back trying to lift it, the loss of two inches of screen space seems like a small price to pay. It’s like the good folks at Wacom read what I wanted and gave it to me in the shape of the Cintiq 22HD.
A few of the newer features available in other Wacom tablets would be nice in the future – but as of now, I consider this to be the best tablet available. I used to consider the 24HD second to none. Now, I must retract that statement: it’s second to the 22HD. If you really, really want that extra two inches of screen, and don’t mind the hassle of a mounted 64-pound tablet with fewer control keys then hey, more power to you. But for everyone else, I can’t recommend the Cintiq 22HD more highly. At $1,999, it’s worth every cent of the price.
Freelance artist Fernando Caire is an employee of The Gnomon Workshop and CG Channel’s Associate Editor. You can contact him at fernando [at] cgchannel [dot] com
Thursday, August 7, 2014
The Lone Ranger: the best VFX you never noticed?
Monday, August 19th, 2013 | Posted by Jim Thacker


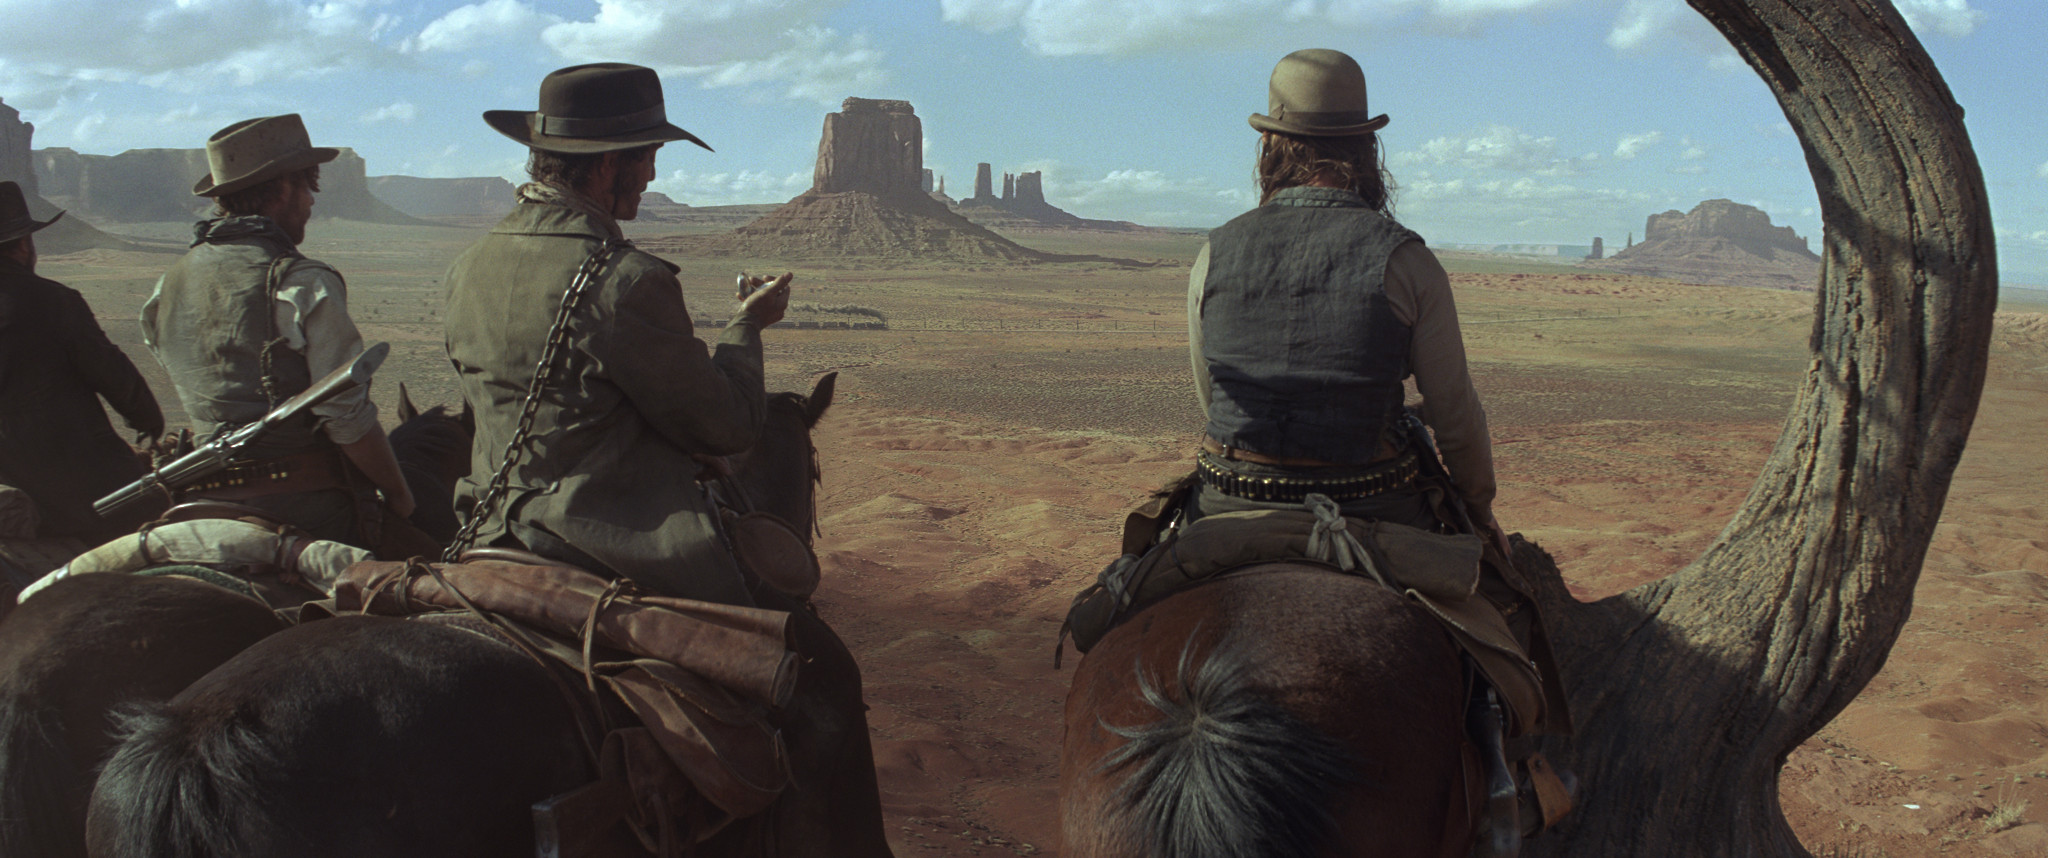
Forget the plot: the backdrops in The Lone Ranger are literally out of this world. VFX supervisor Tim Alexander and digital matte supervisor Dan Wheaton of ILM tell us how the movie’s largely full-CG environments were created.
The Lone Ranger may have taken something of a mauling, both at the box office and at the hands of the critics, but there’s more to director Gore Verbinski’s take on the classic Western serial than meets the eye.
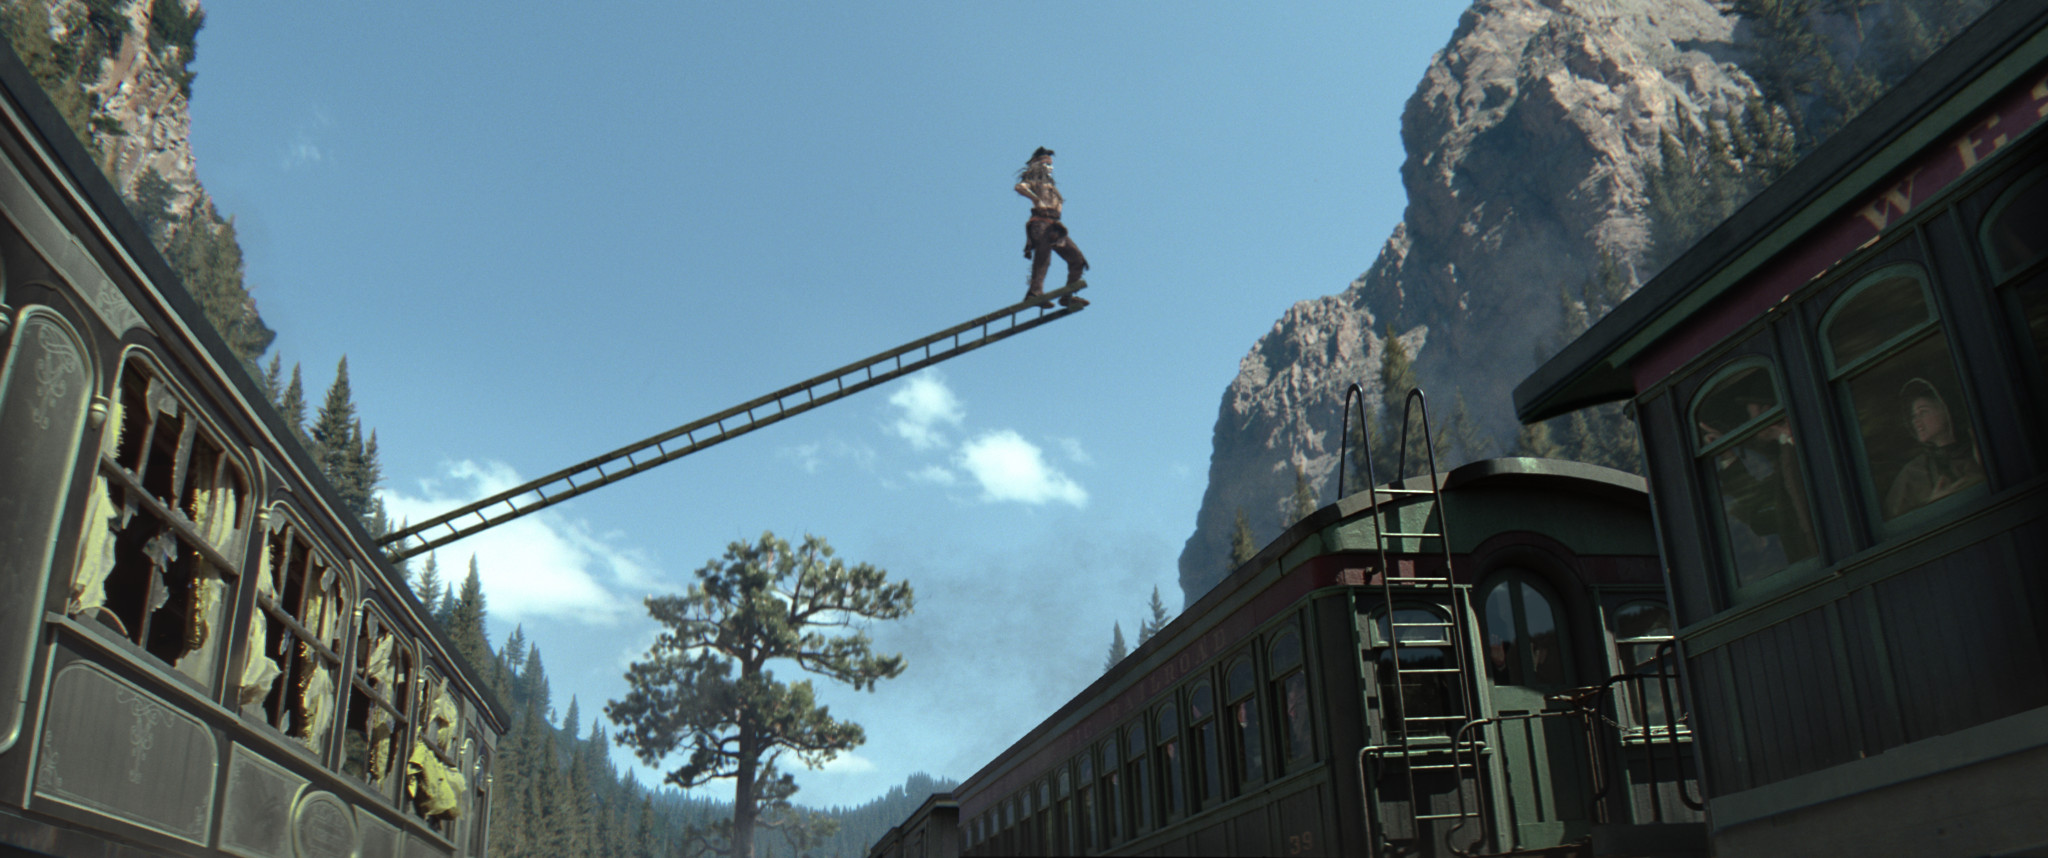
In fact, the best part of the movie may be the one that most critics never noticed – or rather, never noticed had been created by human hands. Industrial Light & Magic contributed 375 visual effects shots to The Lone Ranger, almost all of them invisible, including photorealistic trains and environments.
In this article, VFX supervisor Tim Alexander and digital matte supervisor Dan Wheaton tell us how some of those effects were created, discussing how the facility’s decision to move to a 3ds Max/V-Ray pipeline enabled it to create supremely photorealistic results – and to do so not for a single environment, but for hundreds.
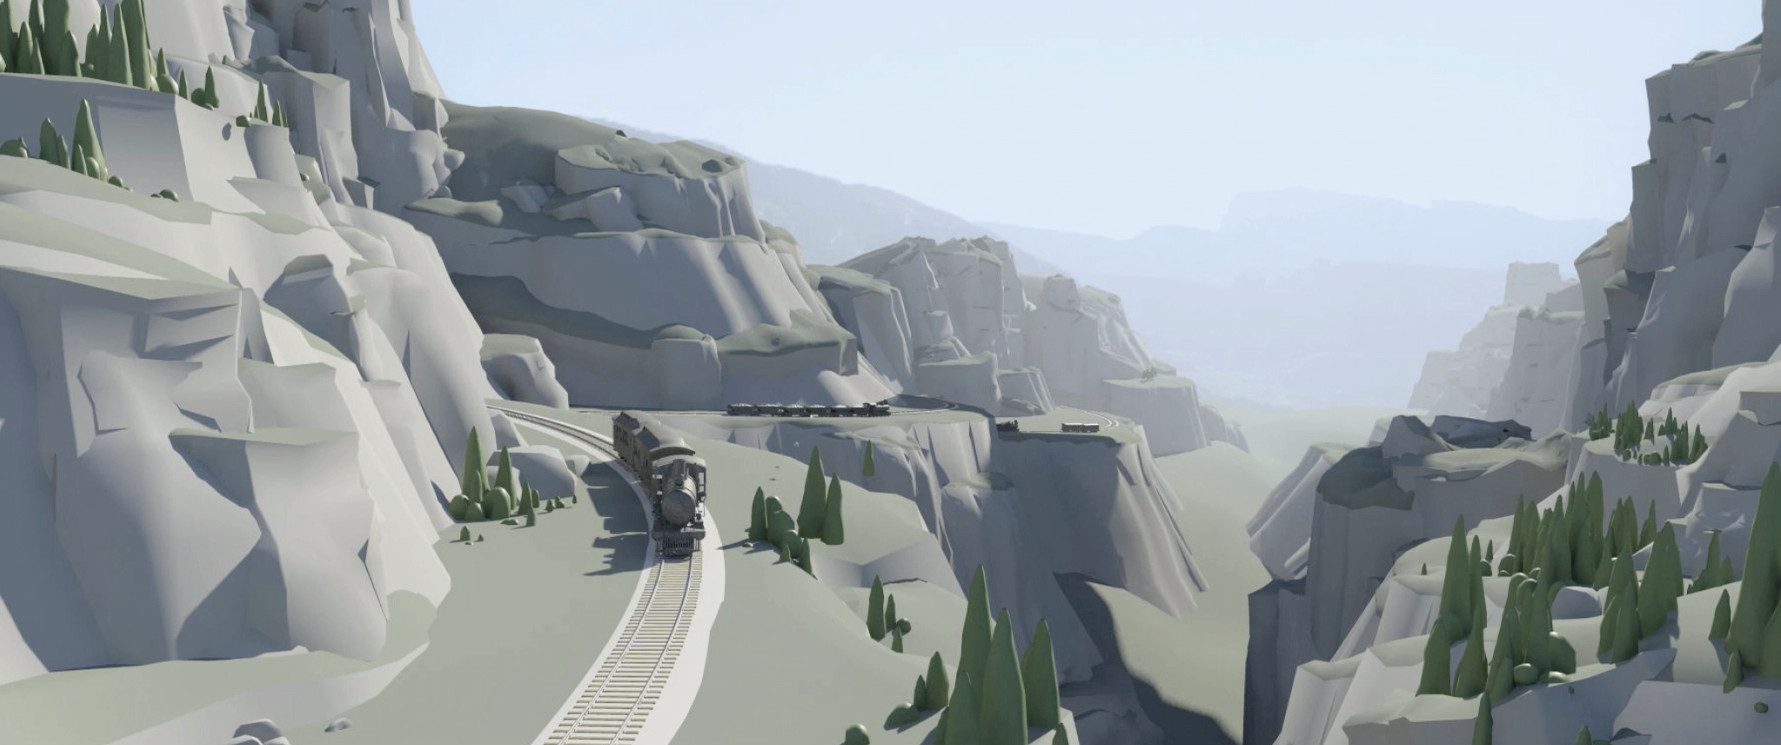
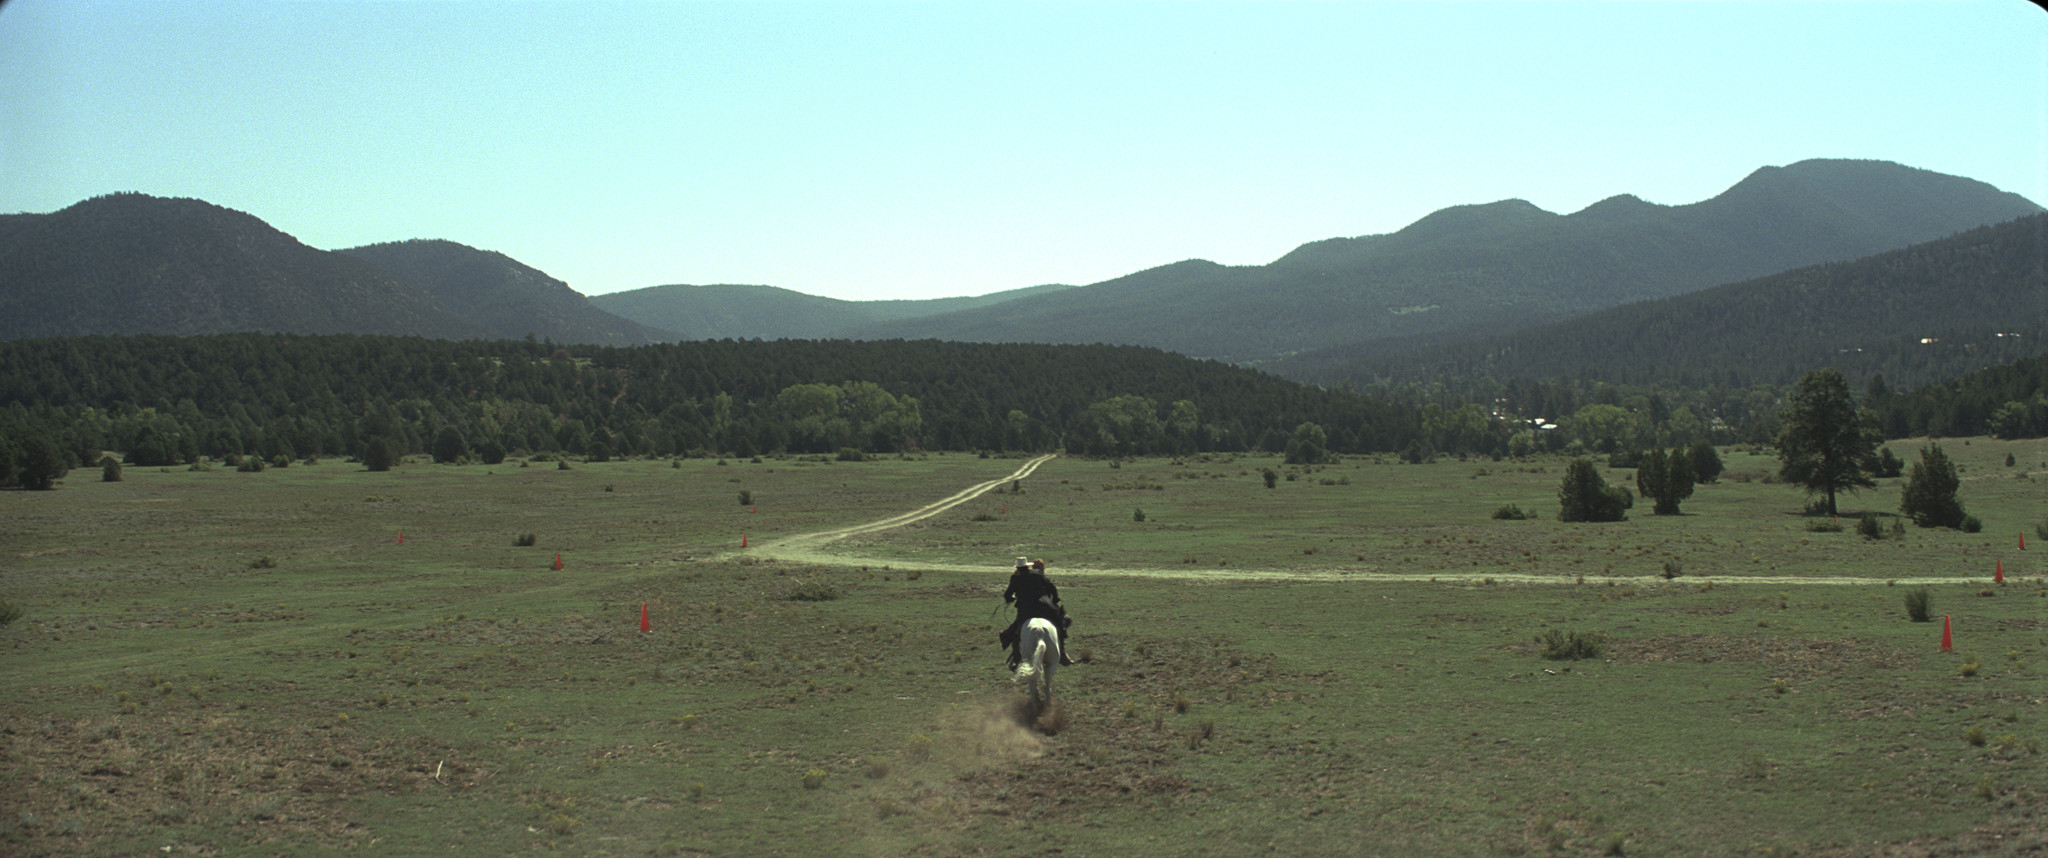
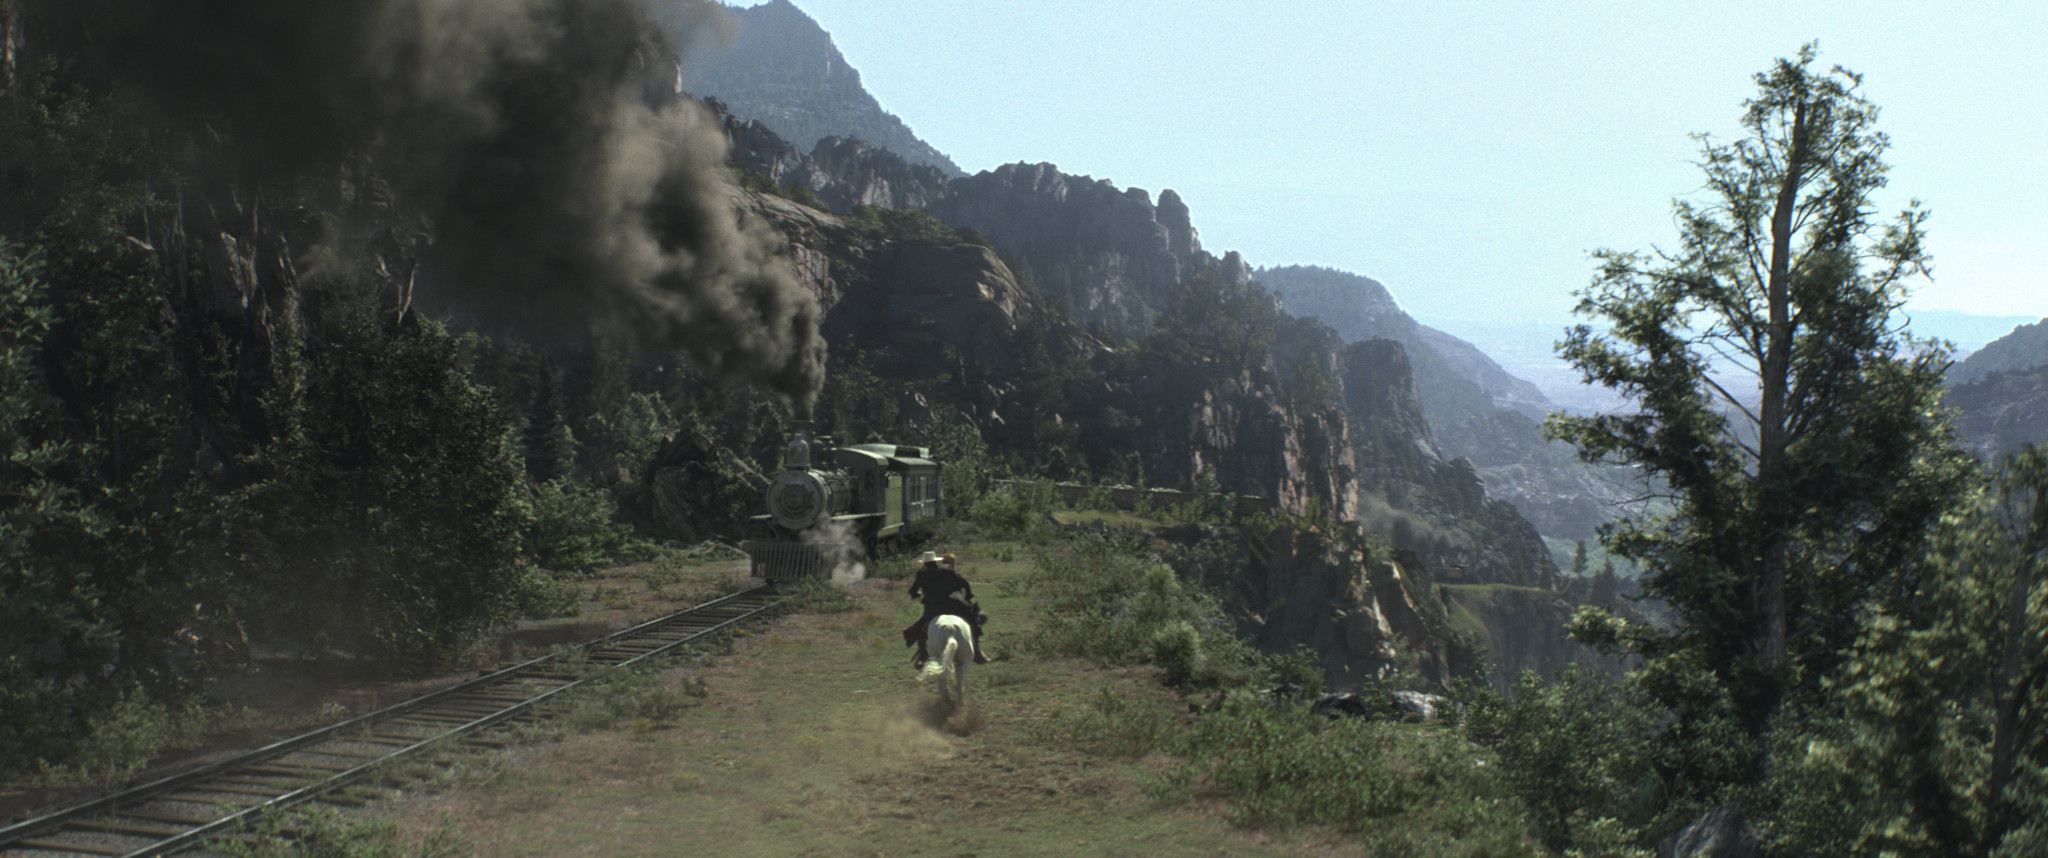
The third act of the movie is a choreographed chase between two trains. ILM worked to director Gore Verbinski’s animatic (top), trying to make CG environments (lowest image) match the pre-viz as closely as possible.
Scouting the locations
Tim Alexander: The third act of the movie is a choreographed train chase, and every single shot, from Gore’s point of view, is intentional. He did previz very early on that we used all the way through production. It was all about timing and music; there isn’t a lot of dialogue.
Scouting for locations that matched the previz took four to six months, then we were out on location for about eight months. We travelled all over the four corners of the States, looking at pretty much every single train track out there. In the end, we shot in New Mexico, Utah, Arizona, Colorado and California.
Our goal was to try to get at least half the frame in camera, knowing that we’d have to put in the other train in CG. We called it our ‘fifty per cent rule’. But when we started shooting, we realised we weren’t going to get as much as we’d hoped. There was the difficulty of shooting actors on top of moving trains and getting good performances out of them. And the production schedule dictated that we had to move back to LA and shoot some stuff bluescreen we hadn’t necessarily wanted to.
When that started happening, we very quickly started capturing reference material. We covered every location in every way possible: LIDAR scanning, tons of spheres, and we drove down the road with either a VistaVision or an ARRI studio camera to shoot plates we could potentially tile.
I thought we might be able to compile some of the plates and use them as backgrounds, but when we took them into post, it was pretty obvious that they weren’t going to work. For one, Gore wanted the lighting to match exactly between the foreground and the background, so we weren’t giving anything away: he didn’t want that bluescreen look. And having to have both trains at very specific points in frame meant that we had to modify the topology quite a bit just to tell the story. Even if we could get a background plate, we’d have to have modified it anyway.
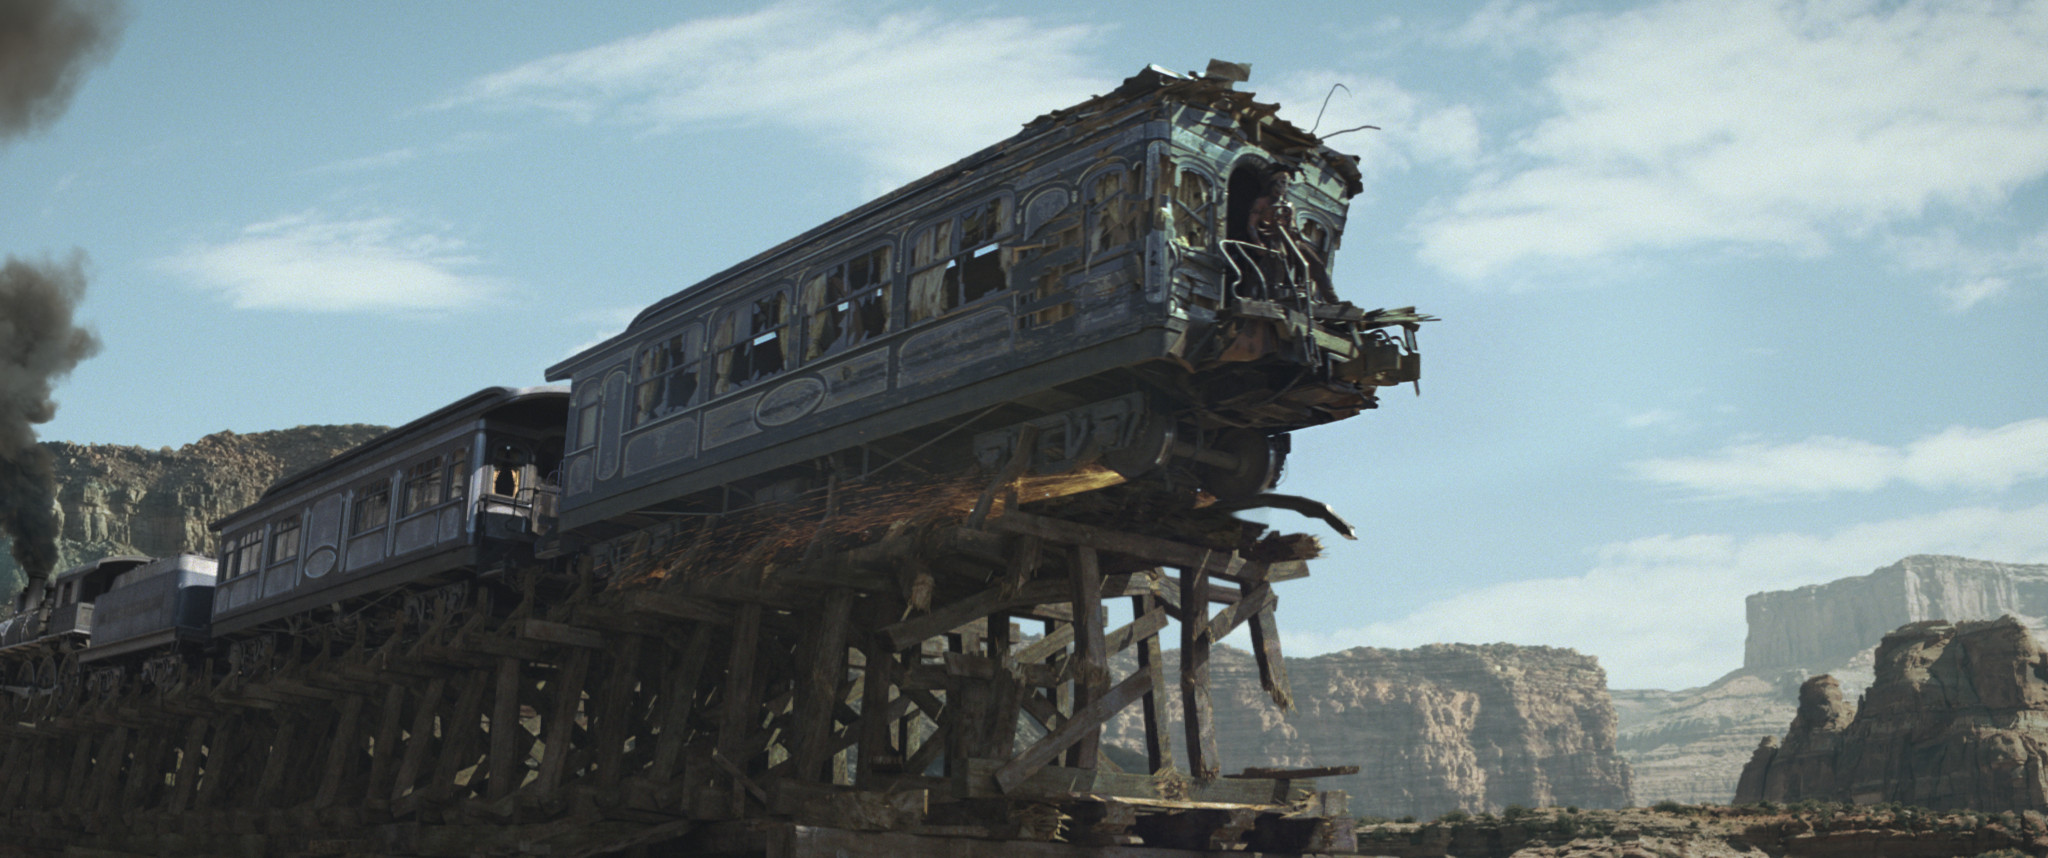
Despite a shoot that crossed five states, the difficulty of finding real locations that matched the action required ILM to create hundreds of individual CG environments, working on a largely per-shot basis.
Building environments entirely in CG
Dan Wheaton: When you build an environment for a show, then drop fifty or a hundred cameras into it and get all your shots out, you’re leveraging a ton of work in a single unified set. What we had here was a moving environment. We were changing from shot to shot on the fly. We couldn’t build a single set; we had to build a set per shot and still maintain that level of finesse and believability, as we moved from foothills through into mountains.
The challenge was two-pronged. We had not only to do invisible work – we all know what forests and hills look like, so there’s no room for suspension of disbelief – but do so on three to four hundred shots where you’re constantly on the move. The original environments were a starting point. But Gore’s mandate to me and our team was to take people on a real ride: to make things believable, but bigger, bolder; as dramatic as we could get.
TA: There was a lot of regular old camera stuff. If you look out of the side window of a moving car, it feels fast; if you look out of the front, it feels quite a bit slower. It’s exacerbated by longer lenses: if you have a long lens and you’re shooting forwards, it doesn’t feel like you’re moving at all.
For the third act, which is all about excitement and speed, that was quite an interesting problem. Gore wanted everything to be going fast, so Dan and his team would have to move things in so close to the train that in reality they would be physically hitting it in order to get things whip by the camera. We also had trains going 60mph, whereas at the time, they were only going at 15mph.

Although based on live background plates, Gore Verbinski directed ILM to make its digital environments “bigger and bolder” than reality, heightening the chase sequences’ sense of speed and drama.
Choosing the pipeline
DW: We leveraged what we had learned on Rango, and before that, on Avatar. The environment work on Rango was really focused on desert, so we developed a pipeline that could handle that. But while Rango was photographic, as far as the level of detail went, it wasn’t photoreal. This time, we needed to get photoreal CG environments.
When we started The Lone Ranger, we changed some of the toolsets under the hood: we went strictly over to 3ds Max, using V-Ray as our renderer. That was the final piece of the puzzle. We were getting not only great render results, but great render throughput: it could handle everything we were throwing at it.
Building the assets
DW: There was never any huge asset-building phase. We started with a very simple layout and worked from there, initially creating rock geometry for very specific uses, then repurposing it, just by dressing sets differently. We kept things fluid and light.
We did most of the asset build in 3ds Max, but it could be in ZBrush [or other packages] if we needed it; there were a variety of approaches.
The texturing is a mix of photographic work and hand painting. There are certain shots that are more matte painter-ish and you need a matte painter’s eye to pull everything together, but we had terrific photo reference, and that keeps you honest.

Vegetation was created almost entirely in SpeedTree. IDV’s vegetation-generation tool enabled ILM to generate variant trees quickly and efficiently, and add subtle animations to bring the environment to life.
Creating vegetation
DW: For the vegetation, SpeedTree was pretty much the only solution we used. It’s a really artist-friendly tool when you’re trying to create something organic. You can get a lot of variety very quickly, just by putting in different seed values. But you can also go in and hand-draw splines and get a match to a tree you want to replicate. It does everything from quick solutions right down to full control.
TA: The other important thing was to have the trees move. That’s always been an issue with big environments. It’s fairly easy to populate an environment, but having all the trees move – and move in an interesting way – is tough.
Again, we were able to get that out of SpeedTree. We didn’t move every single tree, just ten or fifteen that were at the right spot in the frame. Even adding one tree at the right spot in a frame made a huge difference. We didn’t have to move every tree to make the environment feel alive, but we did have to move the right one.
Dressing the sets
DW: The total number of assets that make up the environments is smaller than you would think. We had the most variety in the trees: by the end, we had several hundred models, and animated versions as well. But we only had fifty or sixty rocks and mountains and cliffs. There would be one-offs where we had to model something very specific to match into a plate, but otherwise we were able to reuse our assets very efficiently.
We used in-house 3ds Max scattering tools to populate the environment very quickly. That allowed us to take the trees, put thousands of them into a set and randomise them. You can control the types of trees in an area, and their scale, rotation and density, with a spline or a map.
That was something we leveraged from Rango. Here, we simplified the process and just did a blocking take very quickly: there was no worrying about shaders, we populated a set with a lot of our tree assets, created forests and indicated hills, and ran the camera through it very quickly. In no time, we had a rough take we could use for a large group of shots, and that gave Gore something to feed back on.
Seventy-five to eighty per cent of the environments [from our work on the third act of the movie] were full 3D. We’d built trees at different resolutions from hero-res right on down to a proxy level, and we were thinking, ‘Okay, we’ll put low-res trees off in the distance, then hi-res trees in the foreground, and we’ll be more efficient that way.’ But V-Ray was just such a solid render choice, we used our hero trees all the time. We put ten thousand hero trees out there and we got a look that was great, that rendered quickly, and that kept us flexible: we didn’t have to worry about using cards.
Lighting and rendering
DW: The lighting was really simple. We were always looking to do three-quarter backlit because it’s a setup Gore really likes and he tends to shoot a lot that way, but it was driven by the plates. We used a V-Ray Sun and GI, aiming for a very naturalistic look and feel.
TA: It came down to questions like, ‘Do we use scatter on the leaves? How much specular do we use?’ – all those little details. When you look at a real environment, there’s so much difference between individual trees, and getting that fine detail into our renders was a major challenge.
But from my point of view as the supervisor, the biggest challenge was making the environments look cohesive. With a bluescreen shoot, you might start at 9am and end up at 5pm. You try to cluster shots by sequence, but even then, the sun is drifting, and Gore has a tremendous eye for cinematography. To him a bad lighting direction on a background plate screams ‘bluescreen!’.
It was a matter of moving the lighting direction to match the foreground, and with this methodology we could do that. Traditionally, it’s very difficult to relight from shot to shot: you want to set up one lighting rig and render a bunch of shots with it.
Integrating foreground and background
DW: The more you invest in 3D in the environments, the more you benefit in the integration in the final shots. V-Ray and Max gave us a lot of control. You get a lot of things for free in the render, and then you can break it down to a very granular level for control with the AOVs. And when you’re doing full CG, you can get deep renders, which allows the compositor to get a full 3D representation in the compositing package.
There weren’t any explosions destroying environments, but we did have shots like the one in the trailer of Johnny [Depp]’s character jumping from a ladder onto a train and the ladder getting smashed against a tree. We also had smoke going through shots the whole time.
TA: We had about 150 people on the show, and at one point we had almost 20 FX people just doing smoke!
Despite a few more obvious stunt sequences, the majority of ILM’s effects in the movie are invisible. Dan Wheaton describes the level of quality and consistency the studio achieved as the ‘Holy Grail’ of environment work.
A new benchmark for invisible effects?
TA: Overall, The Lone Ranger was a really fun movie to work on. I’d never worked on a VFX project that wasn’t about robots, or explosions, before.
DW: The work I’m most proud of is probably going to be the work that people never recognise, and that’s because it’s invisible. I had people stopping me in the hall to say that they didn’t realise that the environments were CG until they happened to see the plates.
It was that Holy Grail of creating believable, natural environments – and maintaining that high level over a lot of shots. There are sequences where the movie goes from plate to CG to another plate for 30 shots, and you’d never register it. But you’re seeing our work throughout the entire third act of the movie. Once the William Tell overture kicks in, you’re in our world.
The Lone Ranger is out now on worldwide release. A further 425 effects shots on the movie were created by MPC and around 200 more by an in-house team. All images in this article are courtesy of Walt Disney Pictures.
Subscribe to:
Posts (Atom)